Tuesday, October 26, 2010

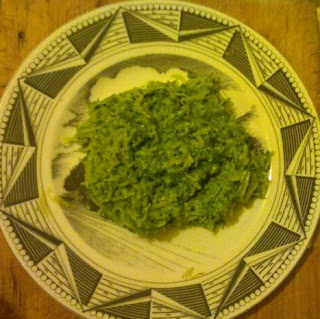
CSA 22: Monster Guts (aka spaghetti squash with pesto)

Monster guts. 'Tis the season after all. I first made this meal a month or so ago and immediately thought "monster guts". Its a funky looking blob of green stringy mush. Honestly it looks like something straight out of a cartoon. But its super tasty and awesomely healthful: spaghetti squash with collard greens and cheese pesto.

For the squash - I find it too hard to cut a large raw squash, but they do cook faster in half, so I cook it about 10-15 minutes whole then cut it. Its still actually kind of hard to cut it but it really speeds the cook time. I pull the seeds  and gook out when I cut it but you could probably bake it with them in it.

As for the green cheese sauce, anything will do fine. I just used what I had on hand: a cheddar cheese stick, a mini Bonbel Light wheel and some fresh Parmesan cheese. And I used collard greens, carrot greens and parsley because its what I had, but spinach, chard, beet greens and any kind of herb would tasty. Of course the sauce would be better with a nut blended in - pine nut, almond, any nut really, and last time I made it I did add almond, but it worked without the nut as well.

Monster Guts
1/2 spaghetti squash
3 collard green leaves
1 clove garlic
handful of carrot greens
handful of parsley
4 oz mixed cheese
olive oil
pepper & Adobo

Bake the squash for about 45-60 minutes until its squishy.

Roughly chop the collards and remove the stems. Boil them for about 10 minutes. Add the carrot greens the last 4 minutes or so. Drain.

Put the greens, the parsley, the garlic and the cheese into a food processor. Start it going and drizzle in some oil. Stop occasionally to scrape down the sides and to season with pepper and Adobo. 

Scrape the spaghetti squash with a fork to release the threads.

Mix the spaghetti with the sauce, revel in its appearance for a moment, and enjoy.

Wednesday, October 13, 2010

Pineapple Coconut Cake


I recently had occasion to bake a cake. And what a fun cake I baked! It was only the second cake I’ve baked in my whole adult life. The last one was a modification of the same original recipe.

Because I don’t bake cakes often I didn’t want to bake one totally from scratch. I was doubtful I could get it moist and perfect on a first try, and I didn’t want the left over ingredients - when would I use cake flour again? But I didn’t want to just open a box and not really contribute to the deliciousness process either. So I started with a recipe that starts with a boxed mix, but with lots of add-ins. I changed the recipe to better suit my tastes and the ingredients I had. Like the pineapple-coconut layer: I had the ingredients available so why not? And why use pecans when I could use almonds?

Pineapple Coconut Cake
1 box white cake mix
1 stick butter, softened
1 cup fat free milk
¼ cup fat free plain yogurt
3 egg whites
1 tsp vanilla extract
½ tsp almond extract
¾ cup crushed pineapple, drained
¾ cup sweetened flake coconut
2 cups chopped almonds
2 cans cream cheese dressing

Preheat oven to 350. Mix the first seven ingredients really well. Mix in ½ cup pineapple, ½ cup coconut, and 1 cup almonds into the batter. Pour into two 8 inch cake pans, sprayed with oil. Bake about 30-35 minutes.
Let cool. Cut each cake in half, flatways to make 4 disks.
In a small bowl mix the remaining ¼ cup pineapple, ¼ cup coconut and ¼ cup super fine ground almond, set aside. In another bowl mix the frosting with the remaining almonds.
Put a few pieces of wax paper on your cake plate. Put a slice of cake in the center, cut side up. Spread some frosting on it. Place a cake slice on it, cut side up. Spread on the pineapple mixture. Place a cake slice on it, cut side down. Spread some frosting on top. Place the last cake slice on it, cut side down.
*Place a round plate on top as a guide, and use a large serrated knife to trim the cake sides. Remove plate and excess cake.
Using not too much icing, ice the side and top of the cake and put it in the fridge for at least an hour. Once well chilled and set, use the rest of the icing to ice the whole cake. Sprinkle with some of the remaining coconut.
Carefully pull the pieces of wax paper out from under the cake, to instantly clean the whole thing up.

*This trimming step is only necessary if you have a wonky oven such as myself and end up with a very over-cooked on the outside, perfect on the inside cake.  If your oven heats evenly, this step is only necessary if you want a smaller cake.

Monday, October 4, 2010

CSA 21: Herb Roasted Potato

Want to cook something delicious?  Something fresh, flavorful, and impressive… yet easy?  I’ll give you the secret: fresh herbs.  Herbs are an amazing food.  First off, they taste good.  They also smell good and they add an appealing sprinkle of color to food.  But mostly, first and foremost herbs taste good, especially when fresh.
Herbs are also nutritional powerhouses.  Don’t ever forget that green leafy vegetables are green leafy plants – that means eating herbs is right up there in responsible healthfulness with eating your spinach or your turnip greens or kale or any of the other green leafy recommendations you’ve heard.  Most herbs are loaded with nutrients including vitamin C, calcium, folic acid, iron and all sorts of flavinoids.
You can buy fresh herbs year round in most grocery stores, or you can easily grow your own if you have a sunny window and can remember to water them.  If you have a sunny yard, most herbs will grow like weeds – delicious aromatic weeds, but yeah… watch those suckers because they will take over (of course you can just prune them back aggressively by way of eating them).  If you don’t want to kill your plants though, try to never harvest more then 30% of a plant in a week.  Personally I grow basil (two varieties), rosemary and mint on my window sill.  I’ve tried dill, chives and a few others, but don’t get enough sun to truly sustain them.  I also recently noticed some marjoram growing as a weed in my aloe vera pot, which as of yet has not molested the aloe in any way, so it remains.  And of course my CSA share often includes a bunch of fresh herbs.
Add herbs to anything you cook – chop, tear, wilt or puree them.  Add fresh herbs to salads, to marinades, to soups and to sauces.  Drop some into poaching liquid.  Use one herb, or a mixture of whatever you have on hand – almost all green leafy herbs compliment one another.  Herbs themselves can also be the main highlight of a dish – for example pesto, or try making a salad using assorted mixed herbs as your greens (you won’t even need dressing!)
A great way to make a really impressive meal is to simply take a large handful of mixed green herbs, chopped very well, mixed with a touch of salt and pepper and some olive oil to make a gooey paste and rub it on a whole chicken.  Try if you can to actually get the mixture between the meat and the skin, although on top of the skin works ok too.  Get every last corner of that chicken coated in the herb paste.  Toss some chopped root veggies in whatever is left of the herb-oil.  Then just go ahead and bake the chicken in a roasting pan surrounded by the veggies.  Voila.  One of the tastiest meals you’ve ever had, I promise.  And really, can it get much easier then: chop herbs, mix with oil, rub on chicken, bake?  Not really when you are talking about actual ‘from scratch’ cooking.
Of course you don’t need to be so elaborate.  Herb roasted potatoes are an easy, always pleasing dish.  They are simple to make yet have a flavor intensity that suggests true culinary prowess.
Herb Roasted Potato
6 small potatoes (red, golden, fingerling, or a mixture)
1 small handful of fresh herbs (I used parley, rosemary, basil, mint and one I couldn’t identify)
1 clove fresh garlic
Olive oil, salt, pepper
Preheat your oven to about 375.  Chop the herbs as finely as you can.  With a garlic press, squish your garlic clove and mix with the chopped herbs.  Mix in some salt and pepper and add a splash of olive oil.  Cut your potatoes into quarters or 6ths, trying to get them to about even size chunks.  Toss with the herb-oil and bake in a single layer about 30 minutes until golden brown and fork tender (large pieces need to cook longer, smaller pieces shorter).  If you think of it, about 2/3 of the way through baking, give them a good stir to flip them for more even browning.